Procedure to update The7 v2 to The7 v7
The7 v.7 has more than 700 settings – twice as much as The7 v.2 has. Don’t hesitate to get acquainted with new awesome features!
Important! Please make a DB backup of your installation, then follow this:
- Download the latest copy of the theme from ThemeForest.
- Rename the old theme folder to /dt-the7-old/ and install The7 v.7 as you do with any other new theme.
- Make sure you use compatible WordPress version and update it if it is required. The supported WordPress version can be found on theme ThemeForest page.
- Before activating The7 theme, deactivate all bundled plugins, older version of those plugins might conflict with the new version of theme.
- After The7 v.7 activation, register yor theme and Update plugins in Dashboard -> The7 -> Plugins. Install and activate “The7 Elements” plugin, if necessary.
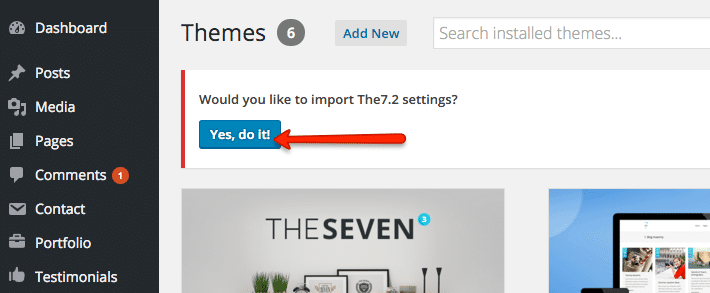
- After The7 v.7 activation, you may a notification asking if you’d like to import The7 v.2 settings, say yes if you want to (as shown in fig. 1).
- GO to Dashboard -> The7 -> My The7 -> Settings and make sure required post types are enabled.
- Configure WPBakery
- If you have a cache plugin, empty its cache.
Review site content, configure new theme options .
If you use a child theme with The7 v.2
Please consider that if some PHP templates or functions had been changed in The7 v.2, they may need to be reconfigured in The7 v7.
1. While a child theme is active, go to Theme Options -> Export & Import, copy theme settings.
2. Rename The7 v.2 folder to /dt-the7-old/.
3. Activate The7 v.2. Go to Theme Options -> Export & Import, import theme settings.
4. Upload The7 v.7 folder to /dt-the7/.
5. Make sure you use compatible WordPress version and update it if it is required. The supported WordPress version can be found on theme ThemeForest page.
6. Activate The7 v.7. Run theme options transfer tool.
7. Go to Theme Options -> Export & Import, copy theme settings.
8. Activate a child theme. Go to Theme Options -> Export & Import, import theme settings.


